Log in or create new account to save this product to your wishlist.

Privet Hedge Planting & Care: The Complete Guide
Everything you need to know for a happy and healthy hedge. From planting tips to pruning and maintenance.
🌱 All important maintenance moments for your lawn during the year. Leave your email and we will send you the lawn calendar for free.
Enter your email
Receive the lawn calendar in the mail
Enjoy a green lawn all year round!
- Order by 2PM = shipped today
- 250.000+ satisfied customers!
- 60 day satisfaction guarantee
Are you looking for a beautiful, green boundary for your garden? Then a privet hedge is an excellent choice. This versatile hedge is attractive and easy to maintain.
- About the privet hedge
- Privet hedge profile
- Characteristics of the privet hedge
- Step-by-step guide: planting a privet hedge
- Caring for your privet hedge
- Privet hedge diseases
- Is your privet dying?
- FAQ about privet hedges
- Ready to take care of your privet hedge?
In this comprehensive guide, we’ll tell you everything you need to know about planting and caring for a privet hedge. We’ll also briefly discuss the different varieties and provide tips to address and prevent common issues.
About the privet hedge
The privet, like box or yew, is a popular hedging plant. It belongs to the genus Ligustrum from the olive family and is fully known as Ligustrum ovalifolium. We primarily know it as a (tidy) hedge, but it also thrives as a standard, in containers, or as a standalone privet shrub.
Privet hedge profile

-
Light: Privet hedges thrive in full sun to partial shade. They can handle different types of light, but they prefer direct sunlight for at least 3 hours every day.
-
Soil: Well-draining, fertile soil is ideal. Privets are adaptable and can grow in various soil types, from slightly acidic to slightly alkaline.
-
Water: Moderate watering needs. Water deeply once a week during the growing season, allowing the soil to dry slightly between watering. Plants that are established are relatively drought-tolerant.
-
Height: Depending on the species and pruning, privet hedges can grow 4–15 feet (1.2-4.6 m) tall. Common varieties like Ligustrum ovalifolium typically reach 10–15 feet (3-4.6 m) if left unpruned.
-
Flowering: Small, white, fragrant flowers appear in late spring to early summer, usually in clusters. However, hedges are often pruned before flowering to maintain shape.
Characteristics of the privet hedge
The privet hedge is one of the most beloved hedging plants due to its versatility and easy maintenance. The plant grows quickly and is suitable as a tall hedge. Here are some notable characteristics.
Foliage and flowering
Privet has oval-shaped, bright-green leaves that give the hedge a fresh appearance. If you don’t prune the privet (heavily), white flowers appear on the shrub in summer – typically between May and July. These flowers emit a pleasant scent and attract bees, butterflies, and other beneficial insects.

After flowering, black berries form, attracting birds and promoting biodiversity in your garden. Be cautious, though: these (unpalatable) berries are mildly toxic to humans and pets.
Growth rate
A notable characteristic of the privet hedge is its rapid growth. In a single year, a privet can grow between 30 and 50 cm. This makes it an ideal choice if you’re looking to create a dense and compact hedge quickly.
Winter hardiness
Privet is renowned for its winter hardiness. It can withstand temperatures as low as -30 degrees Celsius, making it well-suited to our climate. Most privet varieties are semi-evergreen, meaning they retain their leaves in mild winters.
During severe frost or strong winds, the shrub may lose some foliage, but it recovers swiftly in spring. The Ligustrum ovalifolium, also known as garden privet, has the least chance of leaf loss in winter.
Types of privet
There are various privet types to choose from for your hedge. The two most popular are Ligustrum ovalifolium and Ligustrum vulgare (wild or common privet). Ligustrum ovalifolium, or garden privet, has oval leaves and is perfect for a neat hedge.
Ligustrum vulgare often occurs in the wild. This species has narrow, elongated leaves and a natural look. It grows slightly faster than the ovalifolium, which is handy if you want a dense hedge quickly.

The vulgare is less evergreen than the ovalifolium. For an extra evergreen option, consider Ligustrum vulgare ‘Atrovirens’. This variant retains its leaves better in winter.
If you want a low hedge, Ligustrum japonicum (Japanese privet) is a good choice. This ‘dwarf privet’ grows the slowest of all species and reaches about 2 to 2.5 metres in height.
If you’re looking for a privet shrub, consider the Chinese privet. This species has a sturdy trunk and is less commonly planted as a hedge.
Privet location
Privet adapts well to various conditions and can thrive in both sunny and shaded areas. However, in shade, it may grow more slowly and produce fewer leaves. Flowering is also less likely in shaded spots. For blooming, the hedge needs at least 3 hours of sunlight daily during summer.
You can plant the hedge or shrub in almost any soil type, whether dry, normal, or moist. Privet hedges prefer well-drained soil, ideally with a pH between 6 and 8. This is typical for most garden soils.
When to plant privet?
The best time to plant a privet hedge is in autumn, preferably in October. The soil is still warm then, encouraging root growth. Plus, rainfall means less watering is needed. You can plant privet in other seasons too, except during frost.
Bare-root or root-balled plants can be planted between October and April, while potted plants can be planted year-round. For potted privet, loosen the roots well before planting.
Step-by-step guide: planting a privet hedge
Here’s a handy guide to planting your privet hedge.
- Preparing the soil
Before planting, it’s crucial to prepare the soil properly. First, remove any weeds and stones that might hinder root growth. Then, dig a trench about 60-80 cm deep and 40-50 cm wide. Improve the excavated soil by mixing it with compost or planting soil. A good ratio is 1/3 planting soil to 2/3 existing soil.
- Planting
Place the privet plants in the trench at the same depth they were in the nursery. For a dense hedge, plant 4 to 6 plants per linear metre. You can use a piece of string or planting cord as a guide. Fill the trench with the improved soil and gently press it down.
- Apply mulch
Apply a layer of mulch to the spaces between plants. This retains moisture in the soil and prevents weed growth. Water immediately after planting and continue to do so regularly, especially during dry spells. If you’re planting privet as a standalone shrub, allow one plant per square metre.
- Watering
After planting your privet hedge, adequate watering is crucial. Much energy goes into rooting, and if the plant lacks water, the roots may not develop properly. The privet can become bare as a result.
A good rule of thumb is to water two to three times a week initially. If you take good care of your privet hedge, it will quickly become a beautiful green border in your garden.
Caring for your privet hedge
Once your hedge is established, proper care is beneficial for its health and appearance. Here are essential steps in privet care.
Pruning your privet hedge
Regular pruning is essential to keep your privet hedge in top form. When pruning, ensure the top is narrower than the bottom. Otherwise, the inner and lower parts of your privet may become bare due to lack of sunlight.
Start from the top and work gradually downwards. Prune evenly and trim long branches with secateurs or (electric) hedge trimmers. Don’t cut more than a third of the branch length.
When to prune privet?
The best time for pruning is between May and September, preferably on an overcast day. This prevents newly exposed leaves from scorching in direct sunlight.
For a neat privet hedge, prune in April or May and again in September or October. If you prefer a natural look, one summer pruning suffices. For a flowering privet, wait until after blooming (June-July) to prune.
If you wish to drastically cut back a privet hedge, it’s best done in April or May. This allows the plant ample recovery time during the growing season.
A privet shrub doesn’t necessarily require pruning. However, you can trim long shoots or branches with secateurs. If you want to shape the shrub, it’s best done between April and September.
Fertilising your privet
Fertilisation contributes to a healthy privet hedge. It helps the plant grow strong and more resistant to diseases. Especially if soil conditions aren’t optimal or if your privet hedge shares the ground with many other plants, fertilising is an excellent way to keep your hedge in top form.
Do this twice a year: in spring (March or April) and summer (June or July). Choose organic fertiliser pellets or special hedge fertiliser. These release nutrients slowly, which is ideal for privet. Spread the fertiliser evenly and work it in lightly with a rake. Water after fertilising or apply just before rain is forecast.

- Long-lasting effect for 120 days
- Ensures a beautiful, deep green leaf colour
- For both deciduous and evergreen hedges
Privet hedge diseases
Privet hedges can be susceptible to fungal diseases such as leaf spot or powdery mildew. With leaf spot disease, you’ll notice yellow or brown spots on the leaves, often with a dark border.
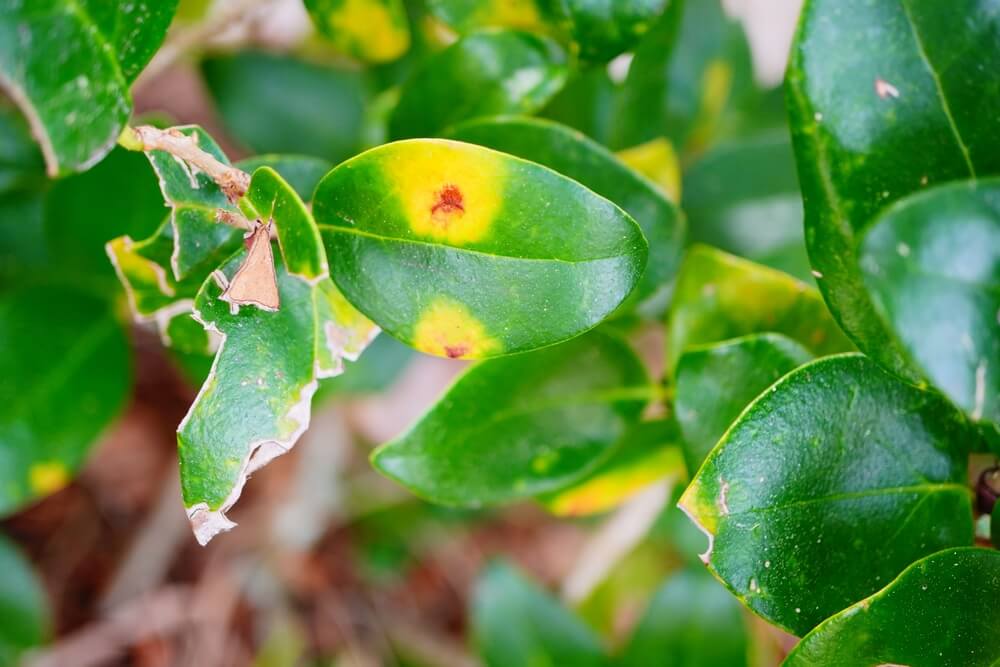
To prevent these issues, ensure good air circulation by proper pruning and avoid overwatering. If problems persist, consult a local garden centre for appropriate treatments suitable for UK gardens.
Remember, a well-maintained privet hedge can be a beautiful, long-lasting feature in your garden, providing privacy and a haven for wildlife. With proper care and attention, your privet hedge will thrive in the British climate, offering year-round greenery and structure to your outdoor space.
Remove affected parts promptly and treat with a (biological) fungicide if necessary. Powdery mildew appears as white or greyish spots on leaves.
Another troublesome condition is Verticillium wilt. This fungus attacks the roots, preventing the plant from absorbing sufficient nutrients. Quick action is crucial to prevent your privet from dying.
Your hedge may also suffer from pests such as caterpillars, aphids, or thrips.
If you notice any disease, act immediately to prevent your privet from dying. Prune affected branches and thoroughly clean your tools to prevent spread.
Preventing privet hedge problems
A healthy privet hedge is less susceptible to diseases and pests. Ensure good soil drainage; prolonged wet conditions can lead to root rot and increase vulnerability to fungi. Water adequately, especially young plants and during dry spells.

Regular pruning, proper fertilisation, and vigilance for potential issues will keep your privet hedge healthy and attractive.
Is your privet dying?
Privets are very long living plants. On average they reach an age of about 30 years. Some even make it to 50. If your privet is not that old it might be dying because of other reasons. Possible causes for privets dying are:
- Drought stress
- Overwatering
- Poor soil drainage
- Nutrient deficiency
- Pest infestation
- Disease (e.g., fungal infections)
- Root damage
- Excessive shade
- Herbicide exposure
- Winter damage
- Soil compaction
- pH imbalance
- Salt damage
- Transplant shock
FAQ about privet hedges
How do you achieve For a full privet hedge, prune immediately after planting to encourage branching. Regular pruning (2-3 times yearly) stimulates dense growth. Ensure sufficient water and nutrients, particularly during dry periods.a full privet hedge?
Maintaining a privet hedge involves regular pruning, proper watering, and fertilisation. Prune 2–3 times a year to maintain shape and density. Water deeply during dry spells, especially for newly planted hedges. Fertilise in spring and summer with a balanced, slow-release fertiliser. Monitor for pests and diseases. Remove weeds around the base of the hedge to reduce competition for nutrients and water.
Privet hedges thrive with organic fertilisers such as compost or a general garden fertiliser. A nitrogen-rich fertiliser, like pelleted cow manure or a specialised hedge feed, promotes growth and keeps the hedge healthy. Apply fertiliser in spring and optionally again in summer.
Ready to take care of your privet hedge?
Privet adapts well to various conditions and can quickly develop into a beautiful, green privacy hedge. With the tips and information from this guide, you’re well-prepared to start planting and caring for your privet hedge. Do you want to check out even more hedge-options? Then have a look at our ultimate guide to choosing the perfect hedges. Or learn how & when to plant a beech hedge.
Any questions? Then drop a comment. Please do the same if you have any tips regarding privet hedges.
Happy gardening!
-
Orchids: A Complete Guide on How to Care for ThemWant to give your orchid the best possible care? Discover essential tips from placement to watering and pruning. Learn everything you need to know!Read more
-
Growing Wisteria Made Simple: From Planting to Perfect BloomsWith blossoms like a purple waterfall, Wisteria sets an almost magical and colourful mood. If you want to grow this beauty in your garden, you’ll need a bit of patience. Don’t worry, it will most definitely pay off.Read more
-
How to Build a DIY Greenhouse: A Practical Guide for Smart SpendersImagine extending your growing season throughout the year, nurturing tender plants regardless of the weather, and creating a personal garden sanctuary. This is precisely what a DIY greenhouse offers you. Let’s learn how to build one.Read more
-
How to Grow Eucalyptus in British GardensWith a little love and care, eucalyptus trees can thrive in English gardens. Since they don’t germinate well without proper help, there are not considered invasive. So, there is no reason not to plant them if you enjoy their looks.Read more
-
Transform Your Garden with All-Year-Round Flowering PlantsDid you know you can enjoy blooming flowers even in January? With the right selection of all year round plants, there’s no need to wait until spring to add some colour to your garden.Read more
-
How to Create a Butterfly Garden: A Simple Guide for British GardensThe UK's butterfly population includes 59 different species. These beautiful winged creatures face a steady decline because of habitat loss, pollution and changing weather patterns. Your garden can become a vital link between nature reserves and natural habitats. Let’s explore how.Read more
-
Volcanic Rock Dust for Your Garden—Application and TipsDid you know that volcanic rock dust is a brilliant organic soil improver? This article explains exactly what it's good for and how to use it properly.Read more
-
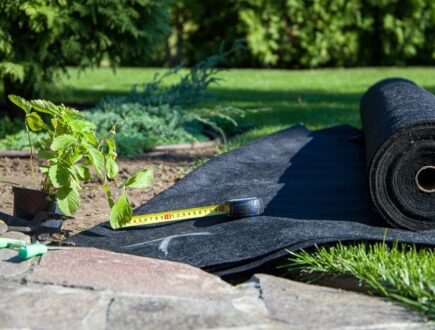
How to Use Landscape Fabric ProperlyIf weeds or erosion in your garden are troubling you, landscape fabric might be the solution. We’ll explain how and when to use it properly, just keep on reading.Read more
Leave a comment
Your answer will be displayed on the site and the interested party will be notified by email.
Leave a comment
Have a question or want to share your experience? Leave us a comment.
- Order by 2PM = shipped today
- 250.000+ satisfied customers!
- 60 day satisfaction guarantee
- Order by 2PM = shipped today
- 250.000+ satisfied customers!
- 60 day satisfaction guarantee

🌱 All important maintenance moments for your lawn during the year. Leave your email and we will send you the lawn calendar for free.
Enter your email
Receive the lawn calendar in the mail
Enjoy a green lawn all year round!






Comments (0)
There are no comments yet. Well then, what are you waiting for to
Be the first to write your comment!inaugurate this pretty page?
Do you have some comments?